Soccer Tactics 3 - Where is the Goal?
We have found the ball, but where is the goal?
To be able to point our robot roughly towards our opponent's goal, we need to use a compass.
Wiltronics compasses and HiTechnic compasses are available in Tasmania for mounting on your NXT robot. We will use the HiTechnic Compass Sensor (pictured below), because LEGO has approved them for use with NXT robots. HiTechnic offers a "Football Kit" that includes a ball, seeker V2 and compass sensor; click here to see the reduced price.
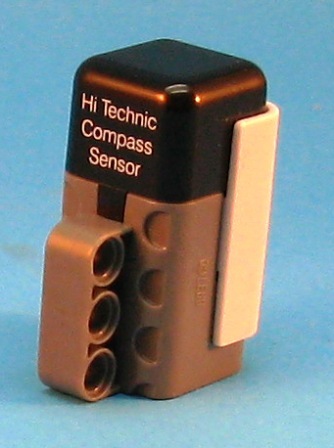
Mounting the HiTechnic Compass on your Robot.
The HiTechnic magnetic compass sensor will only operate correctly in a horizontal position. When building your soccer robot, you must keep the compass level for it to read correctly. This is very important. Also, to minimize the effects of magnetic fields produced by the motors and computer brick, the compass sensor should be more than 15 centimetres (approx. 6 inches) from the motors, and 10 centimetres (approx. 4 inches) from the computer brick. Your robot may end up having a mast like the one on Yaya Lu's experimental robot "Black Beauty" shown below (Yaya chose "all-black" because these are New Zealand's sporting colours).
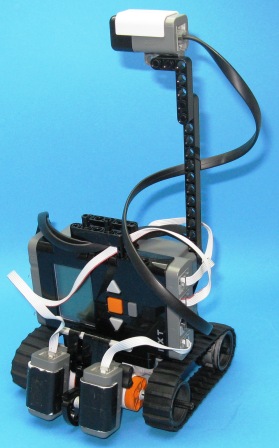
Finding the Compass Direction of Your Opponent's Goal
To be able to find the compass direction of your robot when it is facing your opponent's goal, we need to be able to see the compass reading on the NXT's screen.
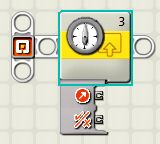
Note that my HiTechnic Compass Sensor is plugged into computer brick socket 3. If your robot has your compass sensor plugged in to a different socket, you will have to change this code.
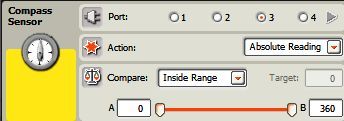
The Compass Sensor control panel setting shown above will enable a compass direction number between 0 and 360 to be available for later display on the NXT's screen.
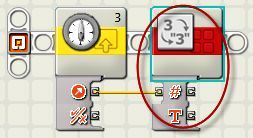
Next the compass direction will be sent through the yellow wire to the "convert number to text" block. Be careful not to leave out this yellow wire connection - if it is left out the program will not work

The code above tells the "compass block" to send the "compass direction number" from the "compass block" through the yellow wire into the "change the number into text block". Converting the "compass direction numbers" to "text" is necessary because only text can be displayed on the NXT's screen.
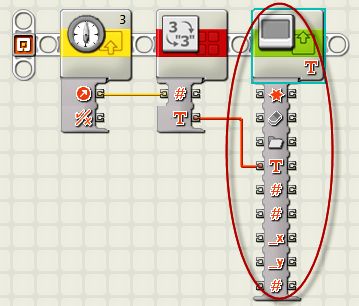

The additional code shown above takes the text from the "change numbers into text" block, and sends it through the red wire in to the "display text on the NXT Screen" block.
In summary; this three-block code will take the compass direction number from the compass sensor, change the direction number into text, and print the text version of the compass direction number on line 3 of the NXT's screen. You can now read the compass direction of your opponent's goal.
But this code will only print the compass number once!
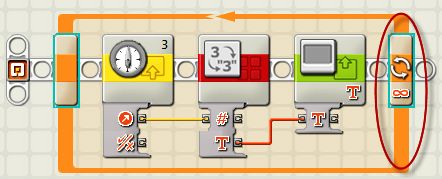
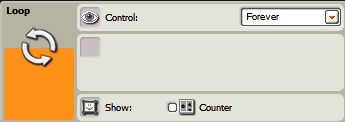
Adding the loop shown above will enable your robot to continually print the compass reading on your LEGO NXT computer brick's screen.
Next comes the important bit. Place your robot soccer player in the centre of the soccer mat, facing in the direction that your robot would face when it is dribbling a soccer ball straight into your opponent's goal (see the yellow arrow below). Start the program on your NXT robot, and write down the compass direction that you see on the NXT's screen.
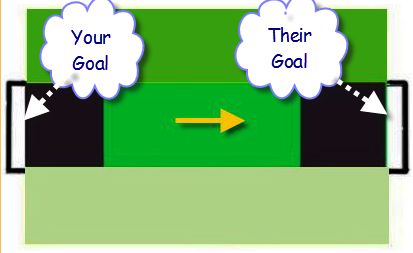
On my soccer mat, using my soccer robot, the reading was 311 degrees; yours will almost certainly be different.
Pointing Our Robot towards Our Opponent's Goal
How do we use the compass reading to tell our Robot to turn towards the half of the Soccer Field containing our opponent's goal?
Our Plan: We can use code to send the compass heading of our opponent's goal (311 in my case, but yours will be different) into our HiTechnic sensor. We can then use the compass sensor's "relative heading" output slot to calculate a positive number if our robot has to turn to the left, or a negative number if our robot has to turn to the right. We can next use that positive or negative number to tell our robot to turn until it is facing in the direction of the opponent's half of the Soccer field.
How to follow this plan: We have to first tell our robot about the direction of the opponent's goal.
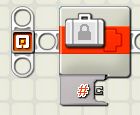

The code above puts the direction of the goal into the code, ready for sending to the HiTechnic Compass. In my case the direction is 311, but the number for your direction will be different - that is OK!
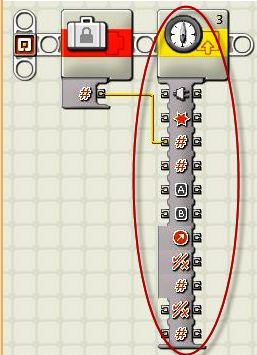
My HiTechnic Compass Sensor is plugged into computer brick socket 3. If your robot has your compass sensor plugged in to a different socket, you will have to change this code.
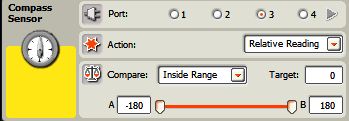
The code above will calculate a positive number if my robot has to turn left, or a negative number if my robot has to turn right; (the left and right directions may be different for your robot, because your robot soccer player may be built differently from mine).
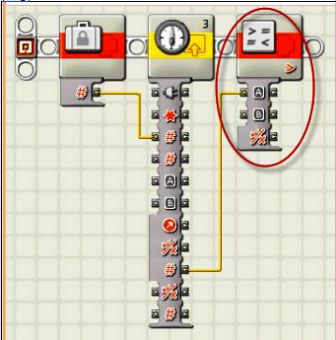

Next we will add a "comparison block" (see above). The positive or negative number from the "compass block" will be sent through the yellow wire into the "comparison block". The "comparison block" can test if the compass number is positive (greater than zero) or negative (less than zero). The compass control block I use (see above) has set the comparison to "Greater than zero". The result of this comparison test can now be sent to a switch block - see below.
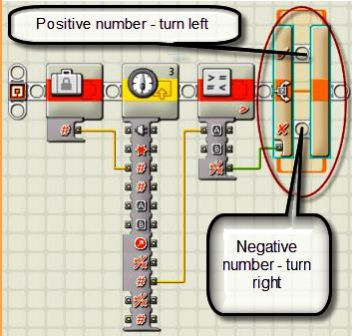

The result of the comparison test is sent through the green wire into the switch block (see above).
Turn left if the comparison test is positive
![]() .
We could add code to the top line of the
switch (see above) to turn our robot left towards the half of the field that
contains our opponent's goal.
.
We could add code to the top line of the
switch (see above) to turn our robot left towards the half of the field that
contains our opponent's goal.
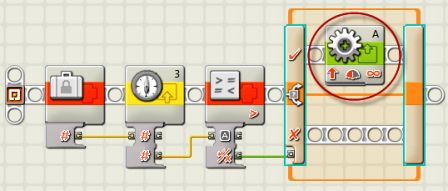

The code above is the first part of the code to turn our robot left. The code runs motor A forwards at speed 60 (see above).
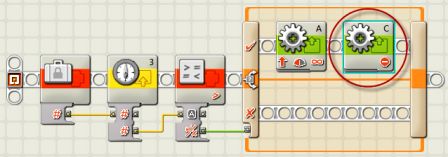

This code above stops motor C. The combination of motor A going forwards, and motor C stopped, will make our Soccer Robot turn to the left, towards the half of the soccer field that contains our opponent's Soccer goal.
Turn right if the comparison test is negative
![]() .
To do this we can add code to the
bottom line of the
switch (see below) that will cause our robot to turn right towards the half of the field that
contains our opponent's goal.
.
To do this we can add code to the
bottom line of the
switch (see below) that will cause our robot to turn right towards the half of the field that
contains our opponent's goal.
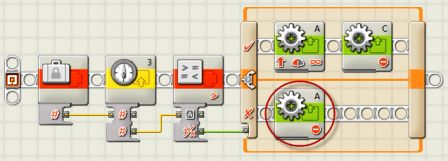

The code above stops motor A when the comparison test is negative.
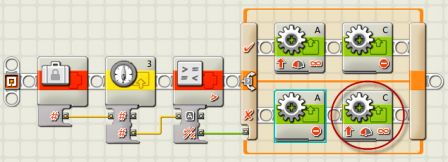

The combination of motor A stopped, and motor C going forwards, will make our Soccer Robot turn to the right, towards the half of the soccer field that contains our opponent's Soccer goal - which is what we wanted.
Note that if your robot is built differently to mine, these "turn" directions may be the opposite with your robot - that is OK!
Testing that our Robot Turns towards our Opponent's Goal
To test if our Robot turns towards the opponent's half of the field, we need to enclose our code in a loop, see below.
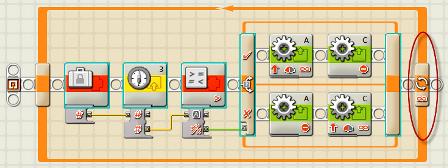
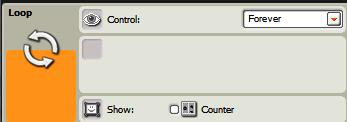
When placed on the mat, our Soccer Robot should turn towards the opponent's half of the soccer field, and then stop. Does it do this?
- If your robot turns towards your goal rather than your opponent's goal, reverse the "greater than zero" (> 0) comparison block code to be "less than zero" (< 0).
- If your robot still does not do what you want it to do, check your code very carefully (especially the coloured "wires" connecting the code blocks).
More Testing.
Now let us test what happens if our Soccer robot is bumped by another robot when it is going towards the goal.


What happens when your robot is bumped? Does it still go towards your opponent's half of the Soccer Field?
- If your robot goes towards your goal rather than your opponent's goal, reverse the "greater than zero" (> 0) comparison block code to be "less than zero" (< 0).
- If your robot still does not do what you want it to do, check your code very carefully (especially the coloured "wires" connecting the code blocks).
When everything is good, go on to the next step to find out how to teach your robot soccer how to kick the ball!
DrGraeme.net - Family Fun With Robotics - LEGO NXT MindStorms - NXT-G - Robot Gen II Soccer step 6
