A Child and a Lolly Jar...
Ready, Set, GO!

Up until now, all the commands we have taught our Robot have resulted in our Robot moving immediately after we pressed the Robot’s orange button the right number of times. However in real life, many things only start after there is some signal to start – for example, a running race is started after “ready, set, GO” with the “GO” being said loudly (or a gun firing instead of someone saying “GO”). Can we teach our robots to respond to our voice? Yes we can!
Adding a Sound Sensor
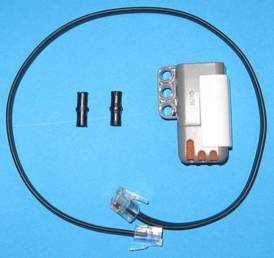
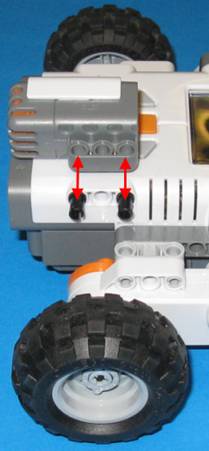
Find the pieces pictured above, and fit them together as shown on the images below.
A Child and a
Lolly Jar…

Do you have a younger brother or sister? If so, you may have seen them inching towards the Lolly Jar, and Mum saying “NO, you CAN’T have a lolly just before dinner, if you do, you won’t eat any of the good food I’ve cooked for you”.
So the child stops, looks carefully at Mum, and when Mum isn’t looking, starts inching towards the lolly jar again, and finally gets there, with a guilty look all over their face…
Let us see if we can make a hungry Robot that creeps towards an imaginary lolly jar, and stops when we yell at it…
Inching forwards…
Go to LEGO MindStorms NXT-G, and start up a new program. Call something like “candy1” (use your imagination – you need not follow my names all the time!)
Next we start the Robot’s list of commands by pulling down the menu “switch” option:-

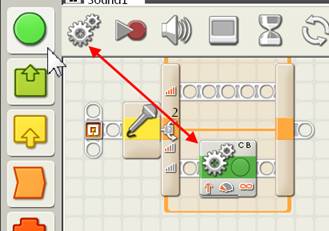
The control panel is set up so that the
“Sound Sensor” is the chosen option (see the red arrows). The
sensor cable is plugged into slot 2 – any of the four sensor
slots that are numbered 1 to 4 can be used, but if you a use
different slot you will have to adjust the slot shown in the
following diagrams. Note
that the sensors will NOT work if you plug them into a motor
port!
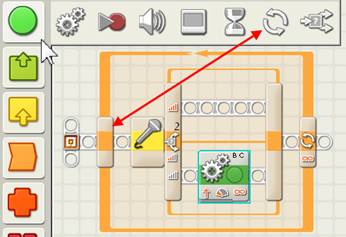
Next we want to send to send our Robot forwards when there is no yell and things are quiet. Move the double motor command down to the bottom line of the sound-controlled switch (as shown above). The corresponding command panel is shown below.

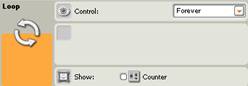
Next, to assist our Robot to go a longer distance, we put a loop around the switch.
If you download the program on the previous page to your Robot, it will run slowly forwards. Even if you clap your hands, it will not stop. Let us teach it how to stop.
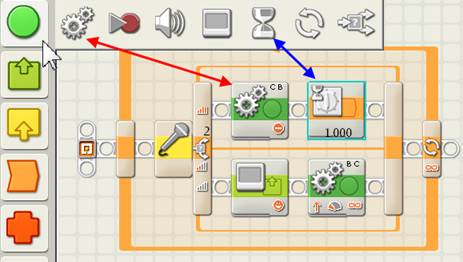
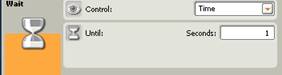
The double motor command (red arrow above, see its command panel below) will stop your Robot,

and the wait command (blue arrow above, see its command panel below) will keep the motors stopped for 1 second.
Is Mummy
watching?
Now let us add some reactions to our Robot.
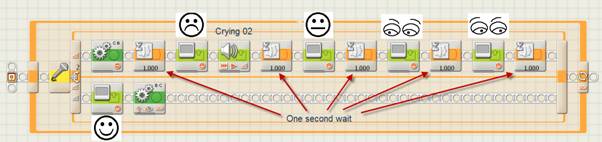
When the Robot is heading for the lolly jar (bottom line) it is happy.
When told to stop (top line) it stops, puts on a sad face, cries, thinks (is Mummy looking?), looks left, looks right, Mummy isn’t watching - so off to the lolly jar again!
Revision
If you have forgotten how to add an expression and voice to your Robot:-
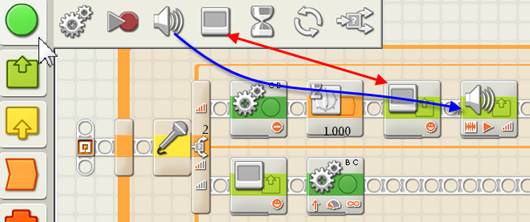
A command panel for an expression (red arrow) could be:-

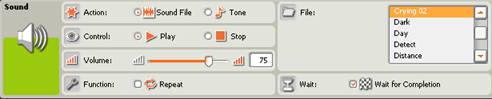
and the command panel for crying (blue arrow) could be:-
Try Out Your Robot
Download this program into your Robot, and see if it will stop when you loudly tell it to stop. Is it an obedient Robot - or is it just as disobedient as a younger brother or sister can be?
When you have finished having fun with your pretend child Robot, you can click on the bottom item of the menu to the left of this web page, and you will be taken back to the list of Challenges, where you can choose another Challenge with which to have more fun!
Theory – Sound-operated Switch
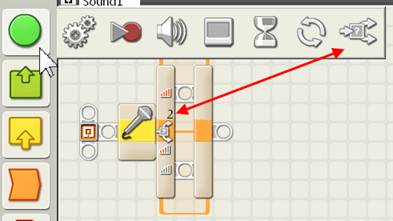
To get the sound sensor to work at all, we need to set the sound sensor command panel to “Sensor” and “Sound Sensor”, (see red and green arrows in the bottom diagram on this web page).
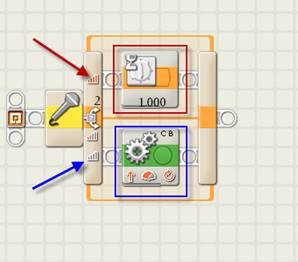
The idea behind the sound sensor switch is that:-
IF a sound is very loud,
THEN the Robot will do something (see red rectangle below),
ELSE if there is less sound it will do something else (see blue rectangle below).
How are we to know which line of the switch is which? The orange portion of the switch pointed to by the red arrow is supposed to represent “big” (a loud sound). The grey portion of the switch pointed to by the blue arrow is supposed to represent “small” (very little sound).
How do we adjust what is loud and what is small?
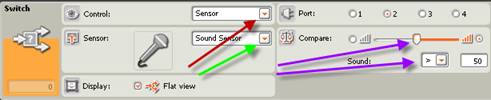
The sound sensor command panel shown above is set so that the sound sensor will react if a sound that registers greater than 50 is heard by the sensor; (> means “greater than”, < means ”less than”). This can be adjusted by moving the slider indicated by a purple arrow, or by typing in a value that is different from 50 into the slot pointed to by the other purple arrow. A low value (e.g. 10) will cause the sound sensor to react to soft sounds; a high value (e.g. 90) will cause the sound sensor to react only when the sound is very loud; the maximum value that can be typed in is 100.
---------------------------------------------------------------
A six-page version of this Challenge in Microsoft Word 2003 format, may be seen by clicking here.
A Child and a Lolly Jar - Tutorial 20 - NXT-G - LEGO MindStorms NXT - www.DrGraeme.net Copyright Dr. Graeme Faulkner